

Epoxy really is a life saver when it comes to common wooden boat repairs. Instead of having to replace entire damaged plywood panels, these areas can be removed and replaced using epoxy to create a strong and resilient wooden boat repair.
Boatbuilding with plywood and epoxy has become more popular in recent years. The simplicity of this method means that even a novice boat builder can produce strong and beautiful designs. However, with any build, there will come a time when a repair is needed – perhaps some dry rot has occurred due to damp weather, or maybe the hull has taken one too many knocks, leaving a dent or hole.
In the past it may have been necessary to replace an entire panel of a boat – a process which can be costly and time consuming. But thanks to epoxy, the damaged section can now be cut out and replaced without losing any of the panel’s strength.
Follow these four step process for a reliable repair.
1. Remove the damage
Using a circular or reciprocating saw, cut out the damaged area. Don’t forget to check the inside of the panel to make sure the full extent of the damage is removed.
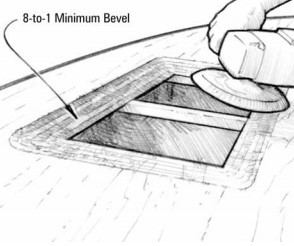
Next you’ll need to grind a scarf on the edges of the opening, which will create a stronger bond. This can be done using a disc sander – sanding a minimum of an 8:1 bevel back from the edge of the opening (eight times the thickness of the wood).
2. Make the replacement panel
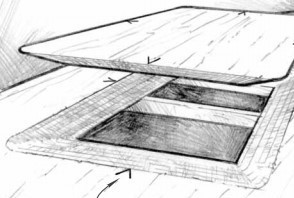
Cut a panel, from the same type of plywood as the original, to match the outside dimensions of the bevel. Use a disc sander to create a bevel on the inside edge of the replacement panel which should match the bevel on the opening. Then, dry-fit the new panel so that it sits just slightly below the existing surface.
3. Bond the panel
Begin by wetting out the bonding area of the panel with a resin/hardener mixture – recoating the end grain as necessary. Keep in mind that the plywood will absorb a lot of the epoxy.
Thicken WEST SYSTEM® Epoxy with WEST SYSTEM 403 Microfibres® to the consistency of mayonnaise and apply to the bonding area. Apply enough of this mixture so that a small amount squeezes out when you push the new panel into position. Then, clamp the new panel in place using temporary staples or screws and clean up any excess epoxy before it cures.
Once the epoxy has cured, you can remove the temporary fastenings ready for the final layer of epoxy/filler.
4. Sand to finish
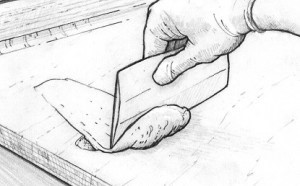
Begin by carefully sanding the surface. Then, use a spreader to fill low areas with an epoxy/407 low-density filler mix. This should have a peanut butter consistency. You should aim to slightly overfill low areas on the surface.

Allow the mixture to thoroughly cure before fairing.